# รีโมทระยะไกลด้วย Windows App (iPhone , iPad)

หลังจากกด Deploy และสร้าง VPS เรียบร้อยคุณจะได้รับรายละเอียดหลักดังต่อไปนี้

<figure><img src="/files/xJfnHR3JYLDRsXzqfvg3" alt=""><figcaption><p>ตัวอย่างรายละเอียด</p></figcaption></figure>

1. <mark style="color:blue;">`IPv4`</mark>  คือ เลข IP Address ของ VPS
2. <mark style="color:blue;">`Username`</mark> คือ ชื่อของ VPS ส่วนมากจะเป็น `Administrator`
3. <mark style="color:blue;">`Password`</mark> คือ รหัสของ VPS

{% hint style="info" %}
คำแนะนำ :tada: เนื่องจากเป็น VPS ต่างประเทศแปลว่ามันต้องเชื่อมต่อไปนอกประเทศ ดังนั้น Internet ที่ลูกค้าใช้มีผลต่อความเร็วและความสมูทของภาพ แนะนำใช้ WIFI 5G ขึ้นไป หรือ เน็ตมือถือ 5G
{% endhint %}

### การตั้งค่า Remote บน Windows App (iOS)

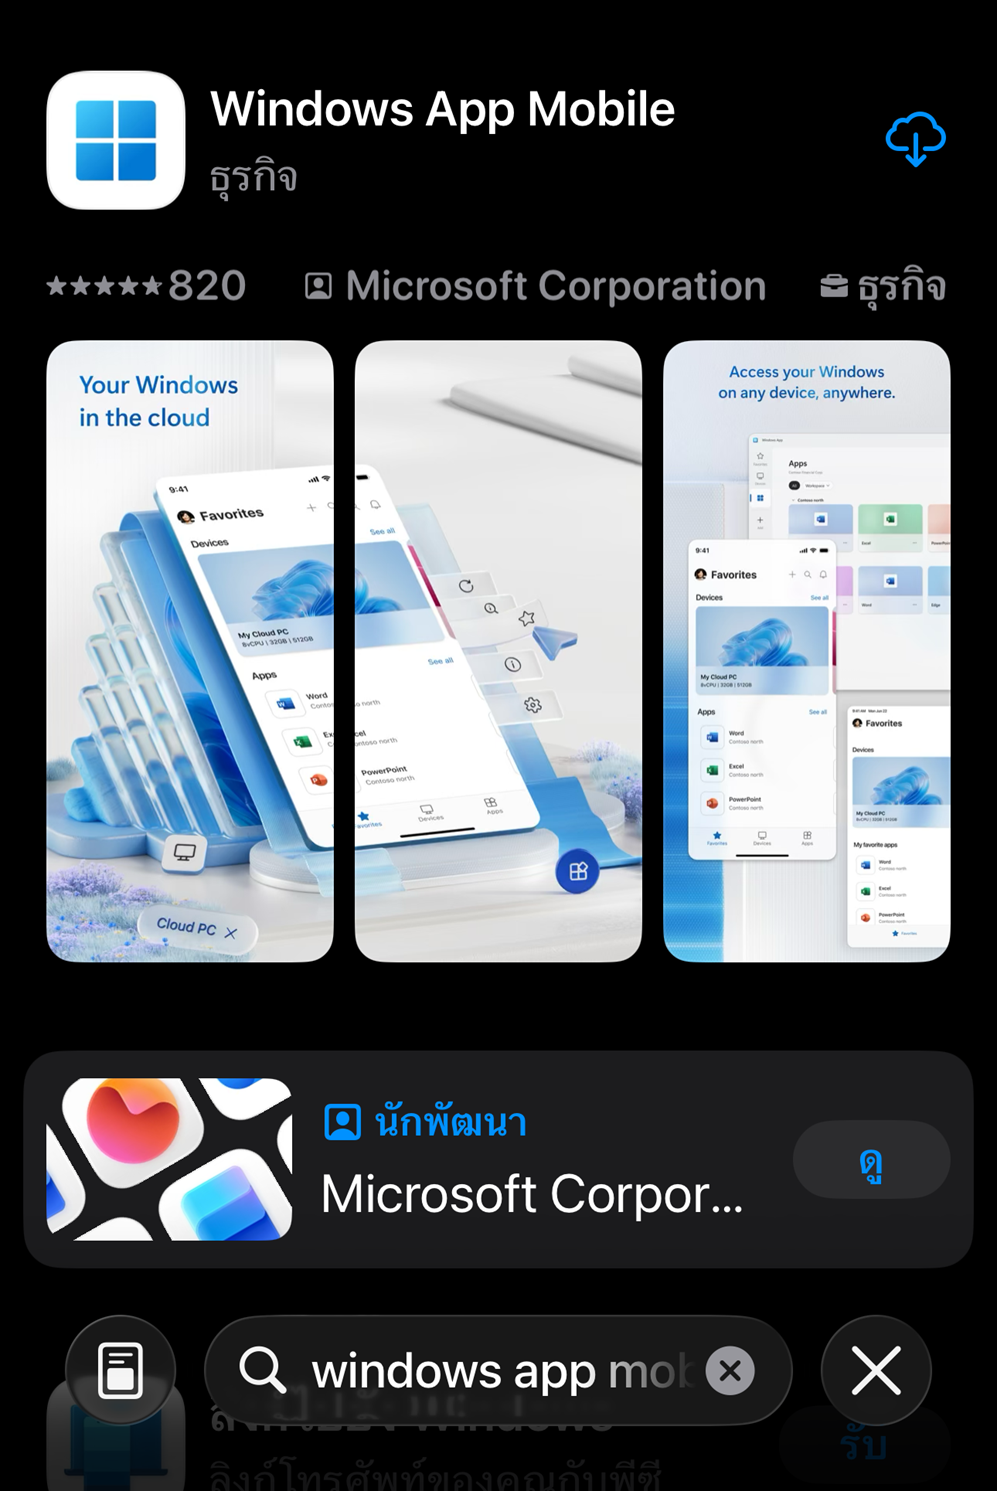
เข้า `App Store` จากนั้นค้นหาแอปชื่อ <mark style="color:blue;">`Windows App`</mark> จากนั้นทำการติดตั้งและเปิด App ขึ้นมา

<figure><img src="/files/4wmPfpcCngrXDYuy5BBU" alt="" width="375"><figcaption></figcaption></figure>

{% hint style="info" %}
หลังจากเปิด app ครั้งแรกอาจมีเด้งให้ยอมรับเงื่อนไขให้กด "**Accept" หรือเจอหน้าต้อนรับให้ Skip**
{% endhint %}

***

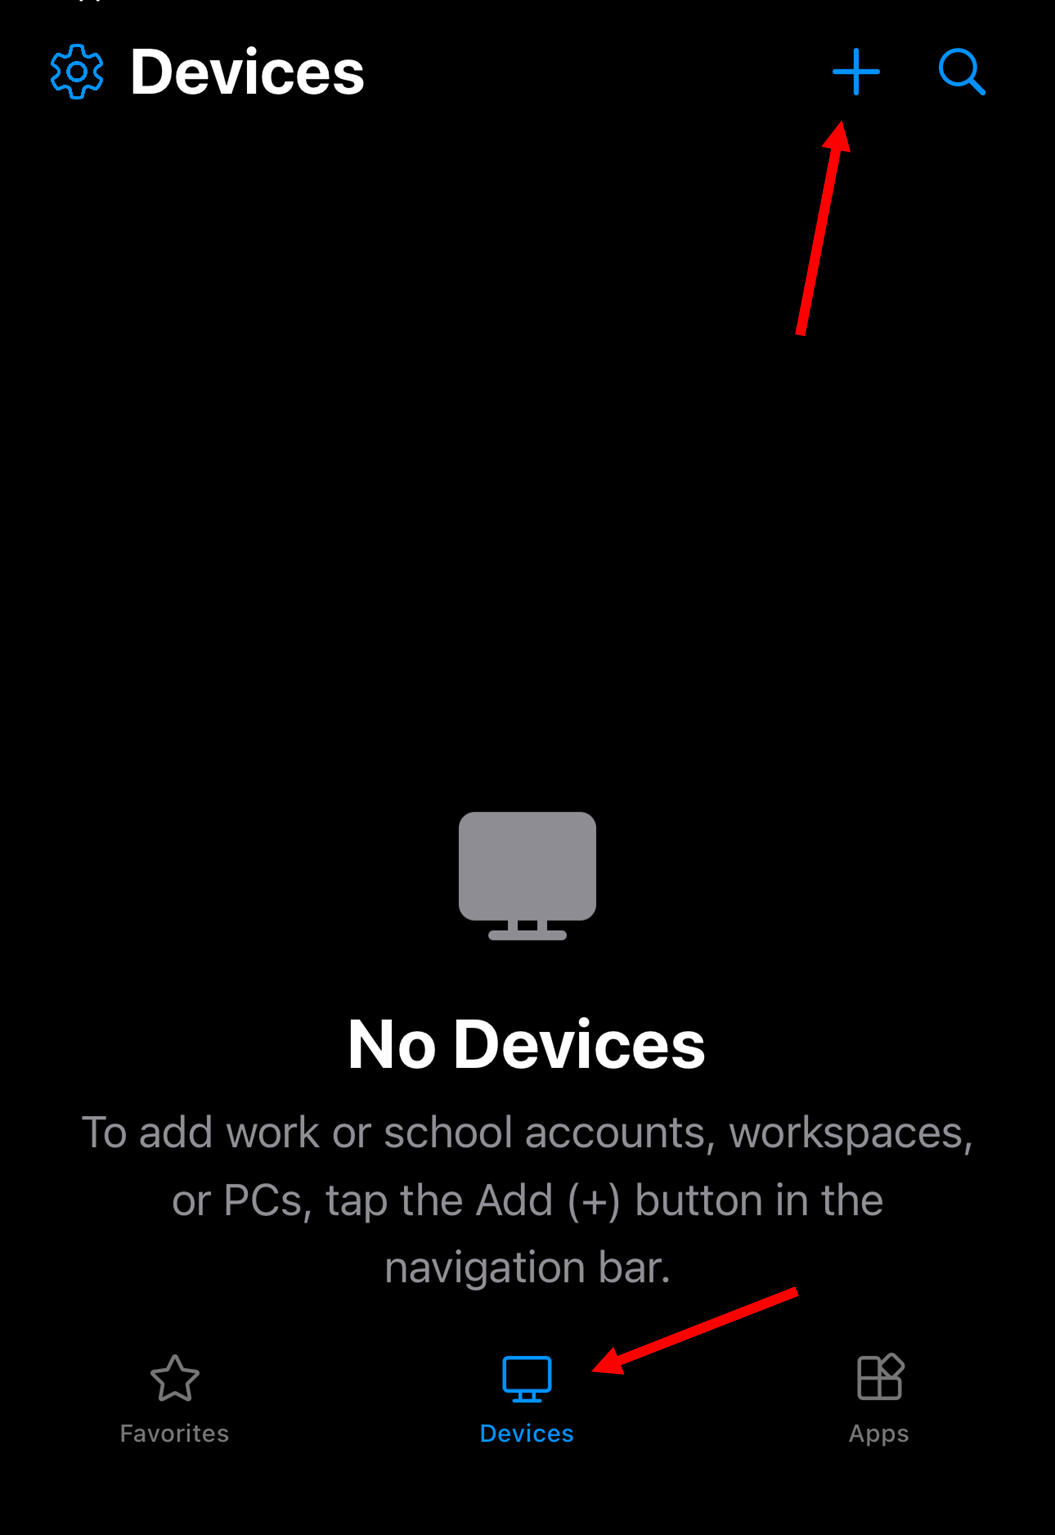
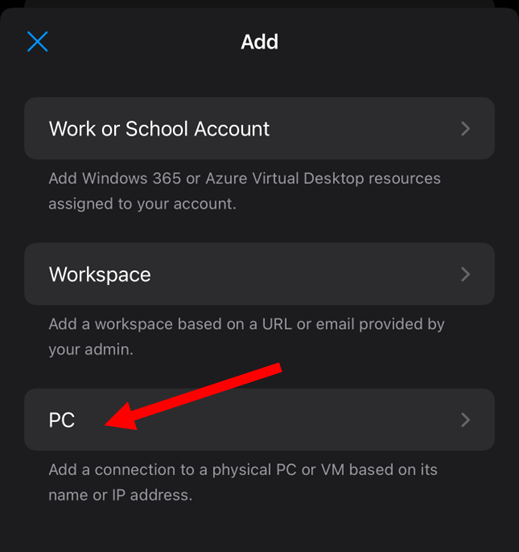
ทำการเพิ่มการเชื่อมต่อรีโมทใหม่ให้กดที่ `Devices` จากนั้นกด  `+`  มุมขวาบน เลือก `PC` &#x20;

<figure><img src="/files/ChZnEC3E2Z7sKGQH34LO" alt="" width="563"><figcaption></figcaption></figure>

<figure><img src="/files/S4OAEVGtXYgH2u0pbMoE" alt=""><figcaption></figcaption></figure>

***

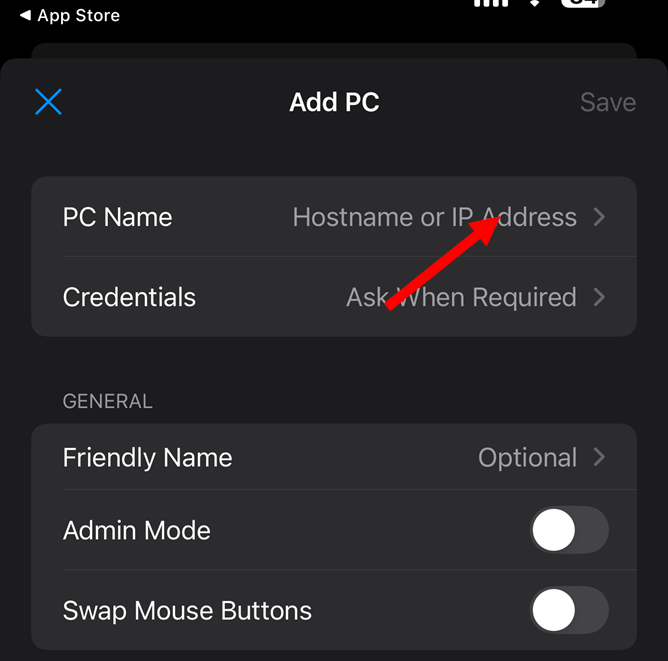
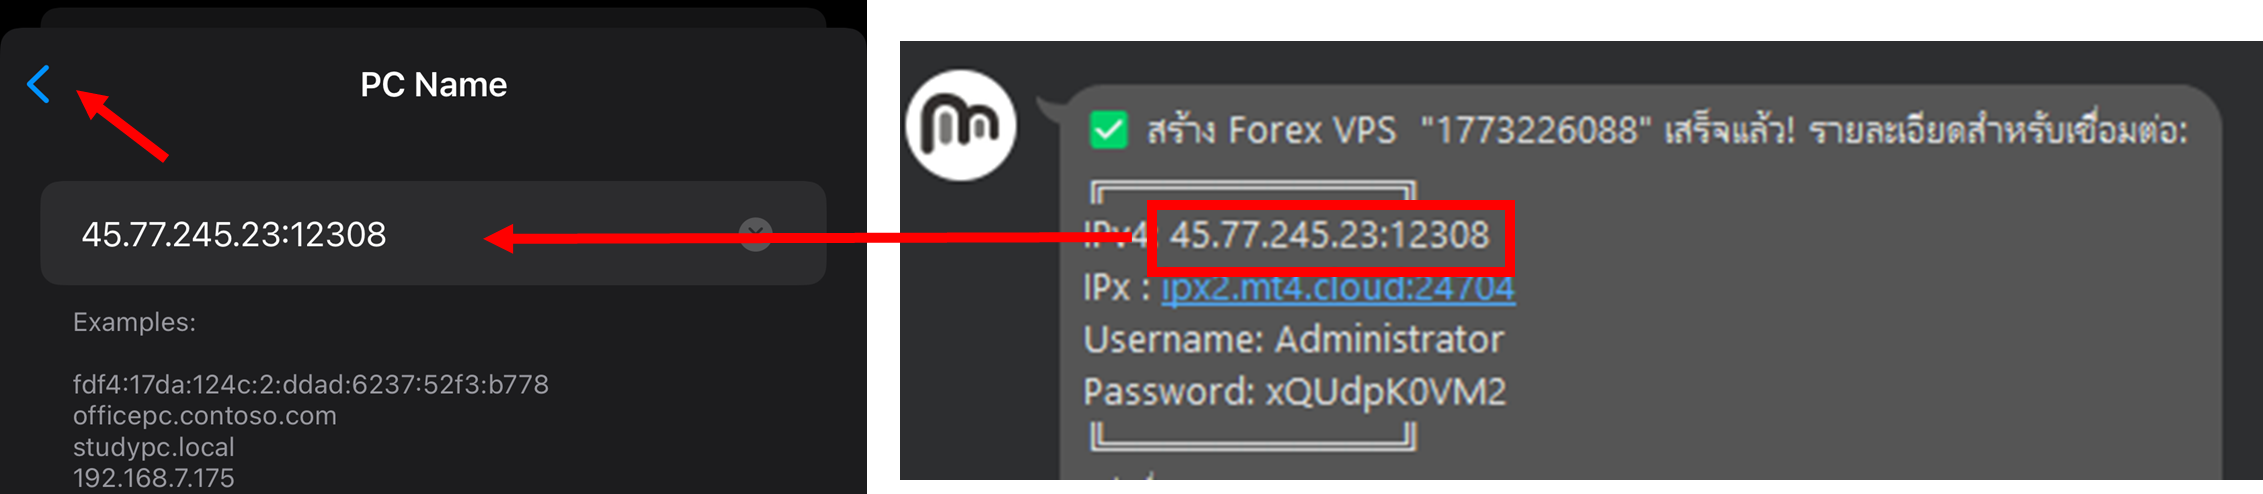
ในช่อง `PC NAME` ให้กด

<figure><img src="/files/etaSwnc2vfdURI3tgI2g" alt=""><figcaption></figcaption></figure>

ทำการกรอก <mark style="color:blue;">`IPv4`</mark> และกด <mark style="color:blue;">`<`</mark> เพื่อกลับ

<figure><img src="/files/6uKe439YHptNm8Poz6j0" alt=""><figcaption></figcaption></figure>

***

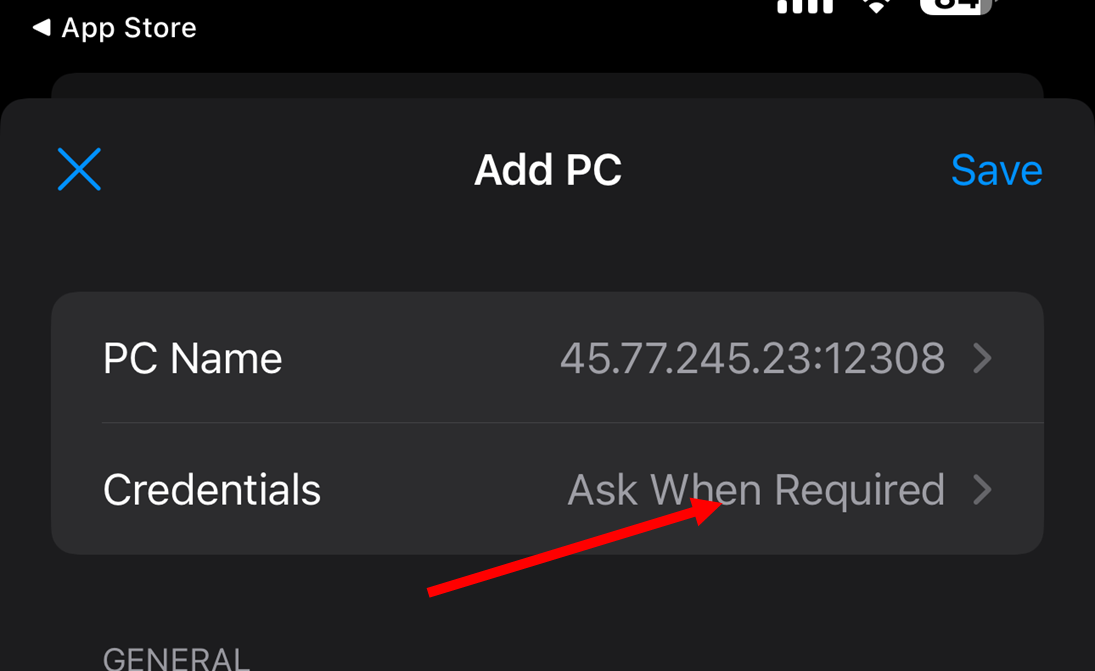
ททำการกดที่ `Credentials` เพื่อตั้งค่า รหัส VPS

<figure><img src="/files/bu6JFJjkUd8beXuhOQ0P" alt="" width="563"><figcaption></figcaption></figure>

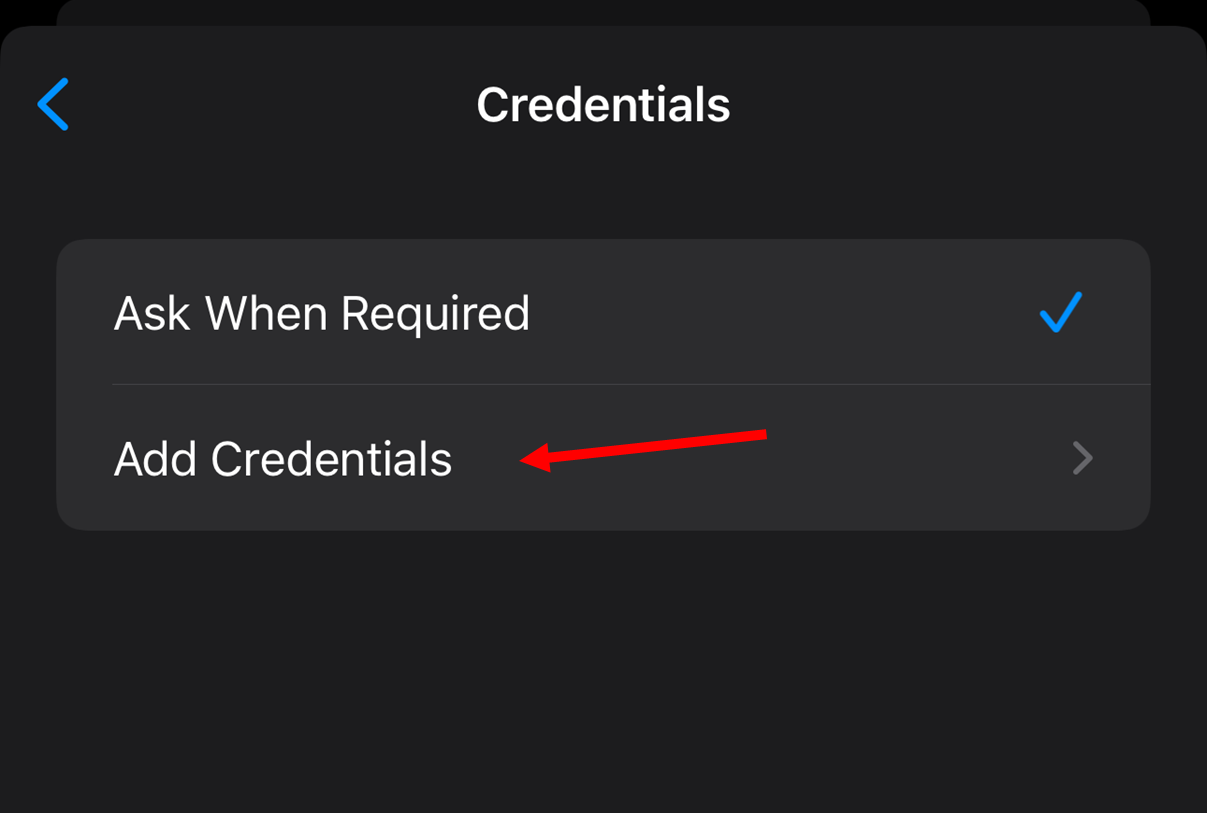
เลือก `Add Credentials`&#x20;

<figure><img src="/files/gXzrdHxjDpqhxKsGhfEP" alt="" width="563"><figcaption></figcaption></figure>

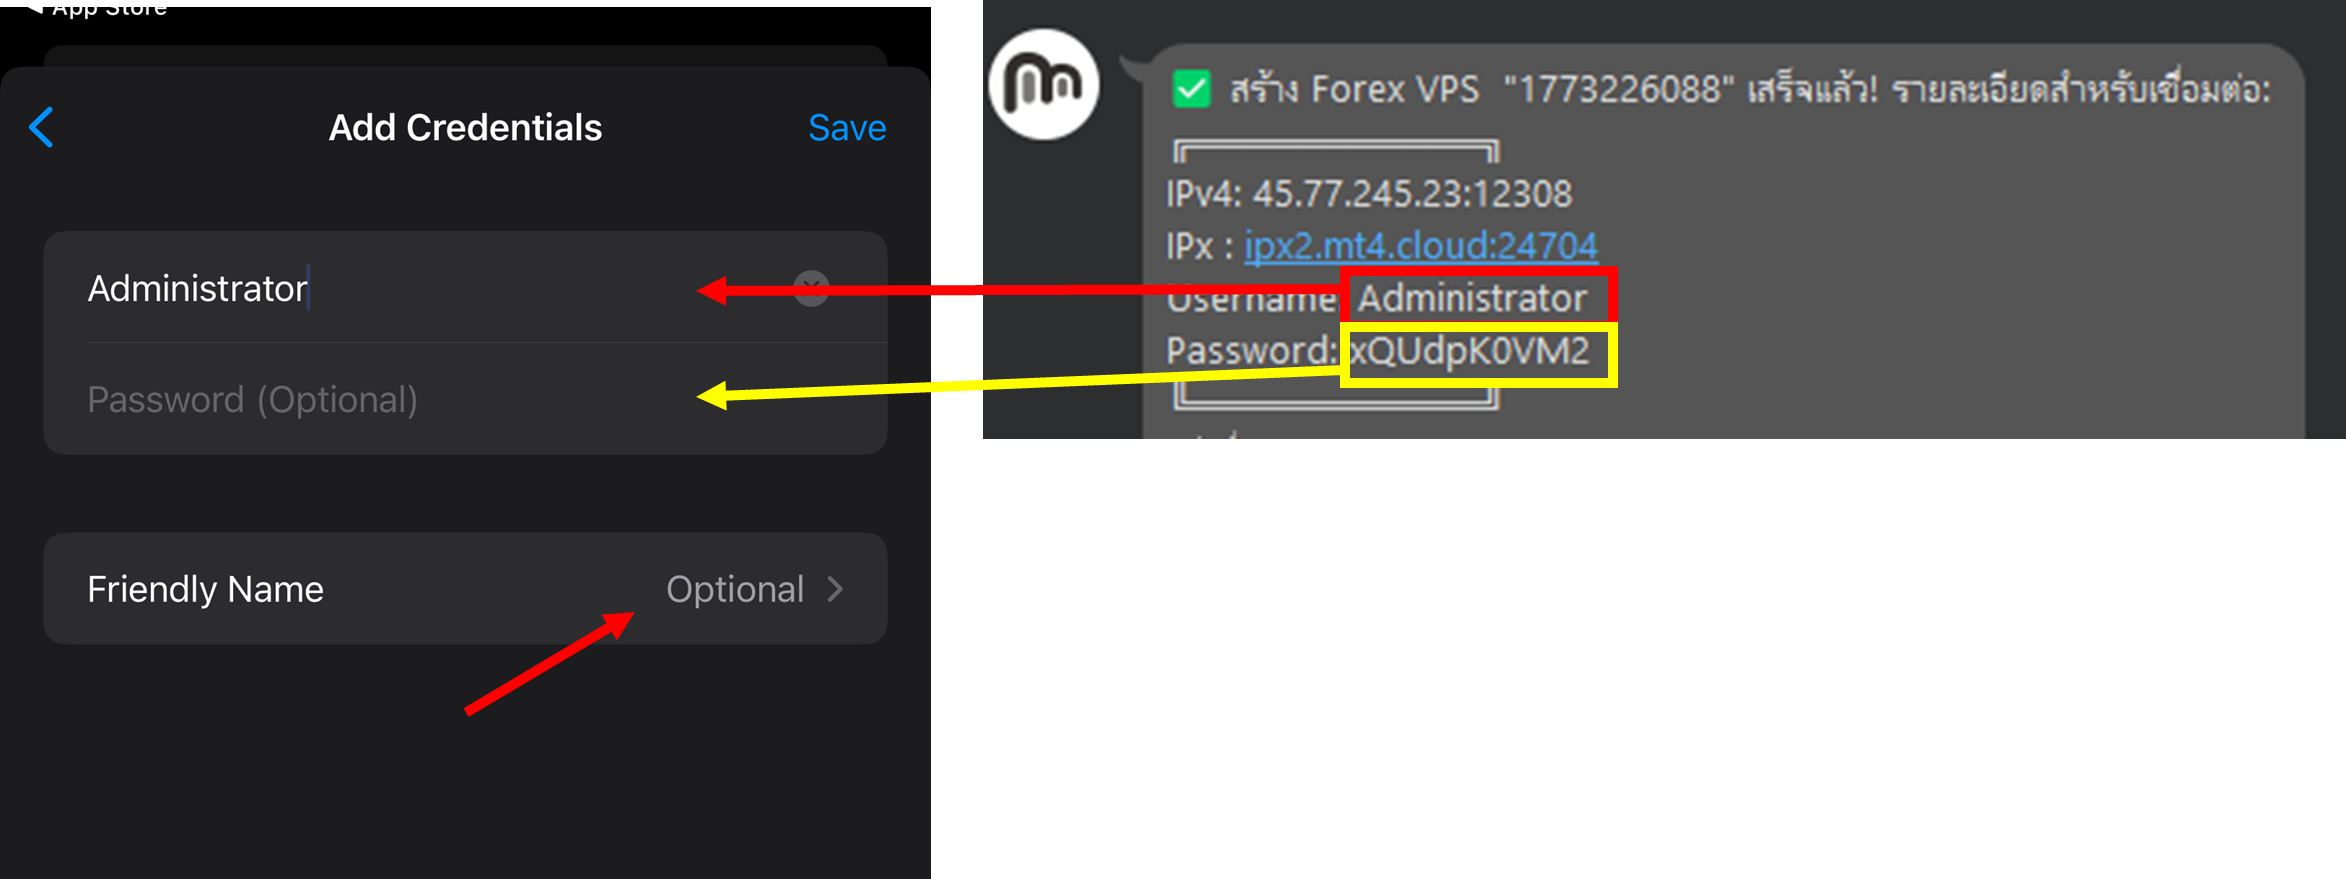
ช่อง <mark style="color:red;">`USERNAME`</mark> ให้กรอก `Administrator`  \
ช่อง <mark style="color:yellow;">`Password (Optional)`</mark> ให้กรอกรหัสของ VPS

{% hint style="danger" %}
หากคัดลอกข้อความโปรดระวังอย่าให้มีวรรคติดมาเด็ดขาดหรือหากพิมพ์เองโปรดอย่าใช้คำอัตโนมัติ มันจะแจ้งว่าข้อมูลผิด
{% endhint %}

กรอกเสร็จกดที่เมนู `Friendly Name`

<figure><img src="/files/h5c8mydSYGapHCWAcb1v" alt=""><figcaption></figcaption></figure>

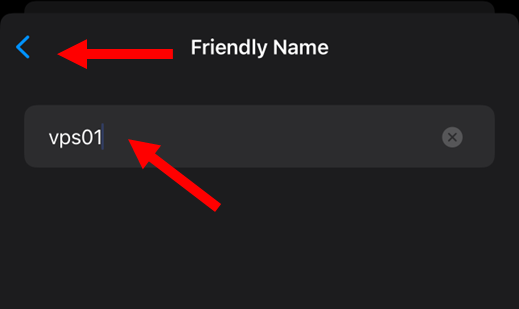
ทำการตั้งชื่อเล่น โดยตั้งเป็นอะไรก็ได้ แนะนำไม่ซ้ำกับหากมีหลาย VPS เสร็จทำการกด <mark style="color:blue;">`<`</mark>&#x20;

<figure><img src="/files/Y1R3AGucbNhgypw0fmZQ" alt=""><figcaption></figcaption></figure>

ตรวจสอบว่าตั้งค่าครบแล้วกด  <mark style="color:blue;">`Save`</mark>&#x20;

<figure><img src="/files/G1htbQq5MI5NpBm4lCKv" alt=""><figcaption></figcaption></figure>

กด <mark style="color:blue;">`<`</mark>

<figure><img src="/files/K41TjmS5YKFlibAwMAgT" alt=""><figcaption></figcaption></figure>

***

กด <mark style="color:blue;">`Save`</mark>&#x20;

<figure><img src="/files/iXdTJre4vUNBVdcwXlkj" alt=""><figcaption></figcaption></figure>

***

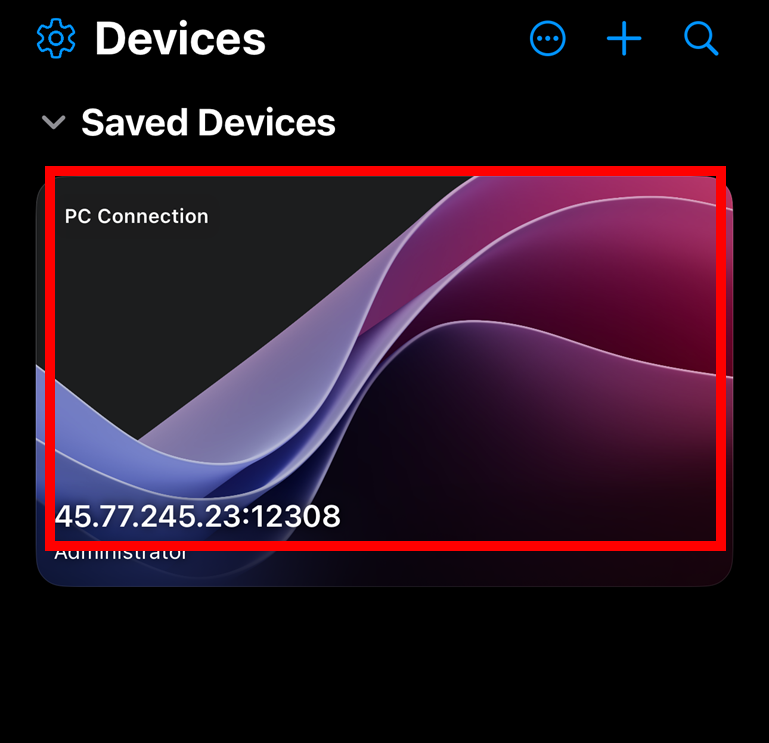
จะขึ้นลิสที่พึ่งเพิ่มเข้ามา กดที่รูปภาพเพื่อเชื่อมต่อ VPS<br>

<figure><img src="/files/1FPE43KV8WhLKcazPyXP" alt="" width="563"><figcaption></figcaption></figure>

***

จะขึ้นจอภาพ VPS สามารถใช้งานได้ตามอัธยาศัย

<figure><img src="/files/efj7bQOkFI2MJGkvTknZ" alt=""><figcaption></figcaption></figure>

***

### <mark style="color:blue;">การตัดการเชื่อมต่อรีโมท</mark>

หากใช้งานเสร็จโปรดตัดการเชื่อมต่อทุกครั้ง เพื่อไม่ให้ Session ค้าง

กดที่รูป 4 เหลี่ยมด้านบน

<figure><img src="/files/URoFSlEKbReYQqVyu1Ck" alt=""><figcaption></figcaption></figure>

***

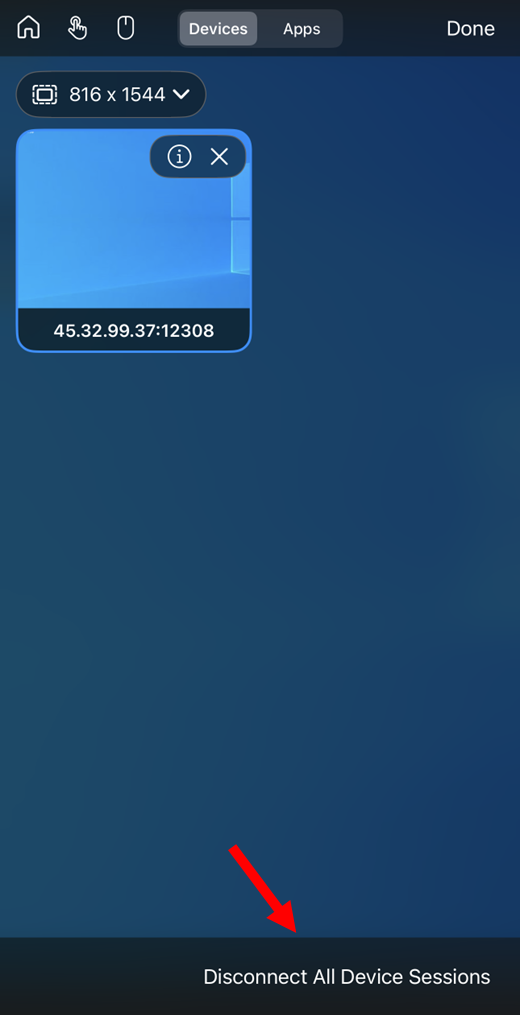
เลือก `DISCONNECT ALL DEVICES Sessions`&#x20;

<figure><img src="/files/Ely49QyY0y4n8O2rut90" alt="" width="390"><figcaption></figcaption></figure>

เพียงเท่านี้การเชื่อมต่อรีโมท VPS จะถูกตัด แต่โปรแกรมใน VPS ยังคงทำงานอยู่ตามปกติ

***

### <mark style="color:blue;">ตั้งค่า Windows App ให้รีโมท VPS แบบรายนอน</mark>

บางครั้งหากใช้ app ครั้งแรกมันอาจจะทำงานรายตั้ง แนะนำตั้งค่าตามนี้เพื่อแก้ไขให้เป็นรายนอน

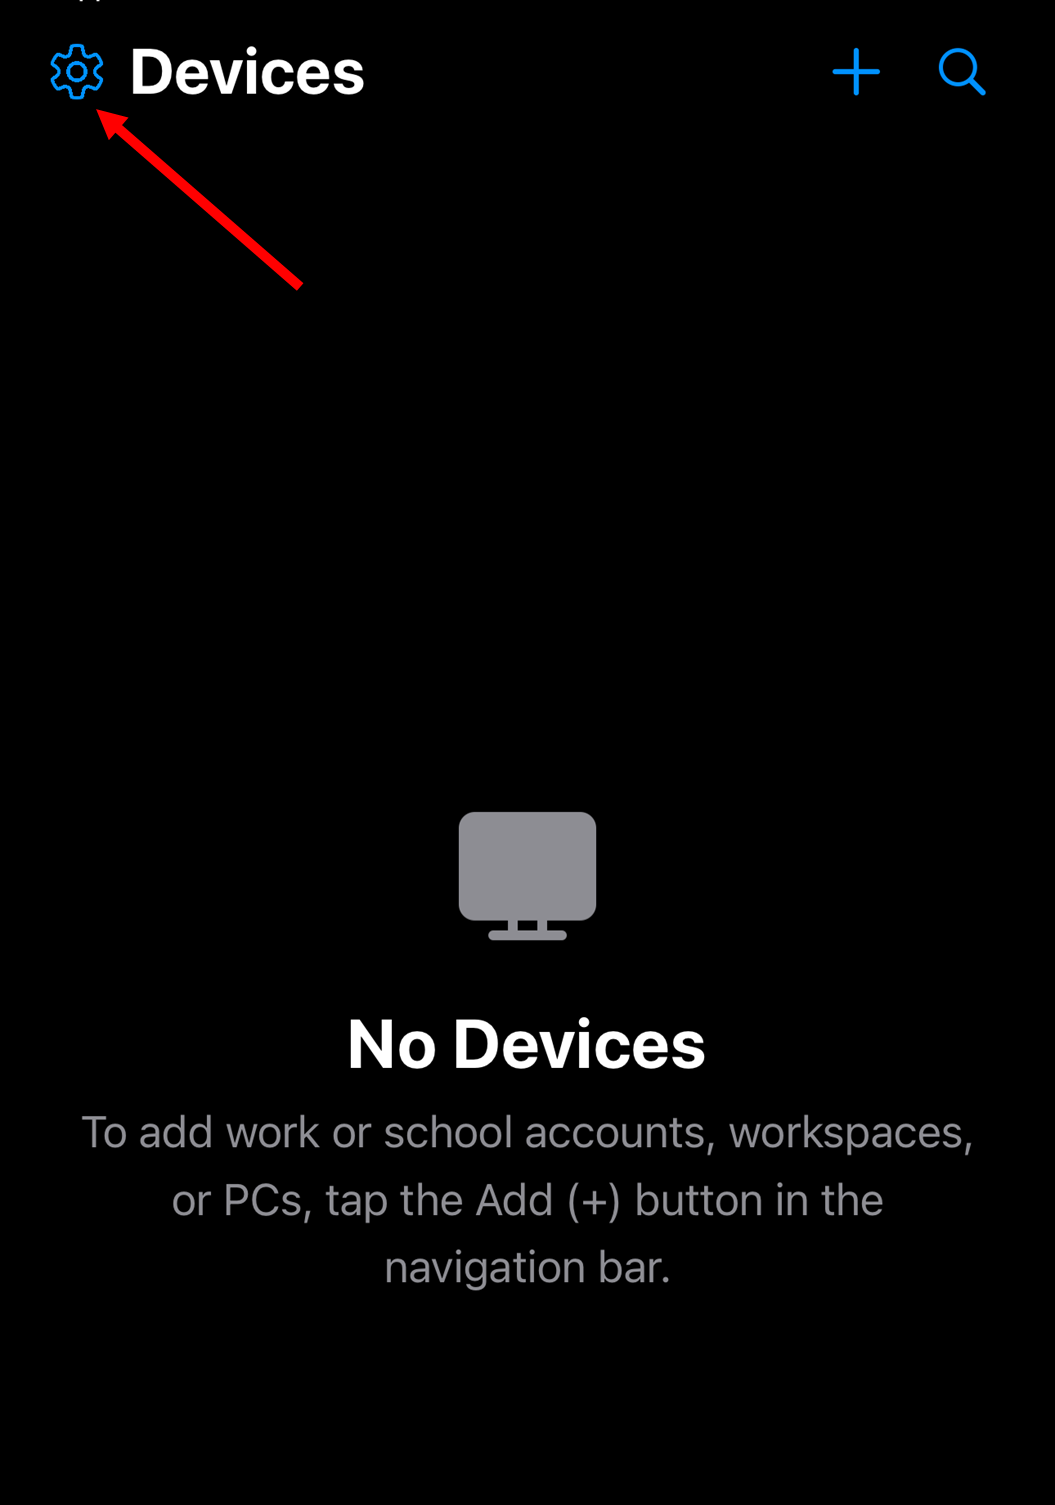
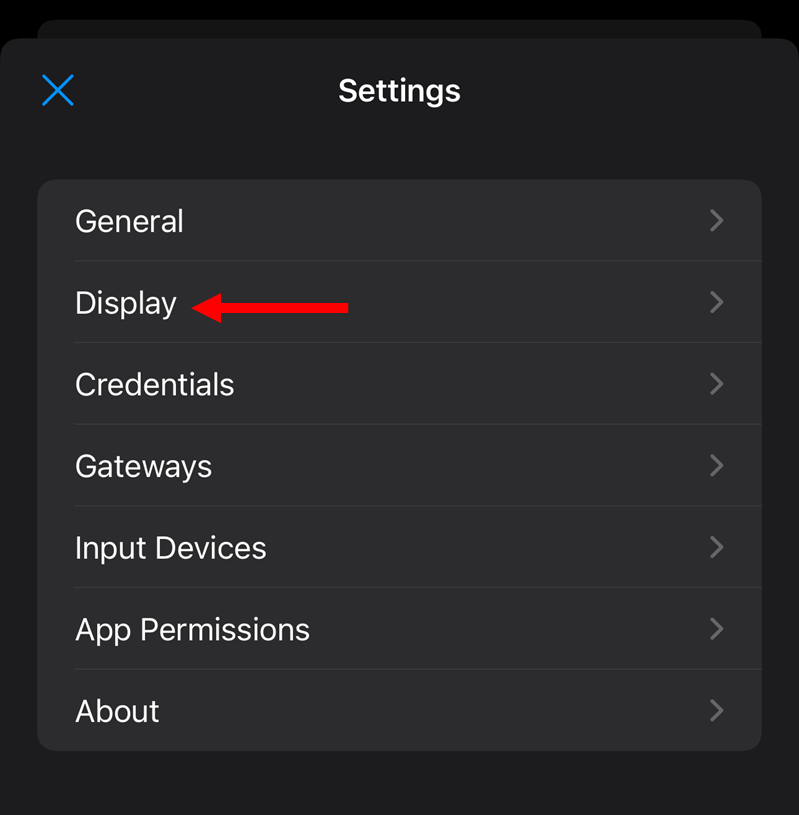
ตัดการเชื่อมต่อรีโมททั้งหมดมาหน้าแรก ของ Windows App กดที่รูปฟันเฟืองมุมซ้ายบน

<figure><img src="/files/paH7UqVmY1OpsyuYwQW2" alt="" width="563"><figcaption></figcaption></figure>

***

เลือก `Display`

<figure><img src="/files/Y204AicjTesvYJj03DvT" alt="" width="563"><figcaption></figcaption></figure>

***

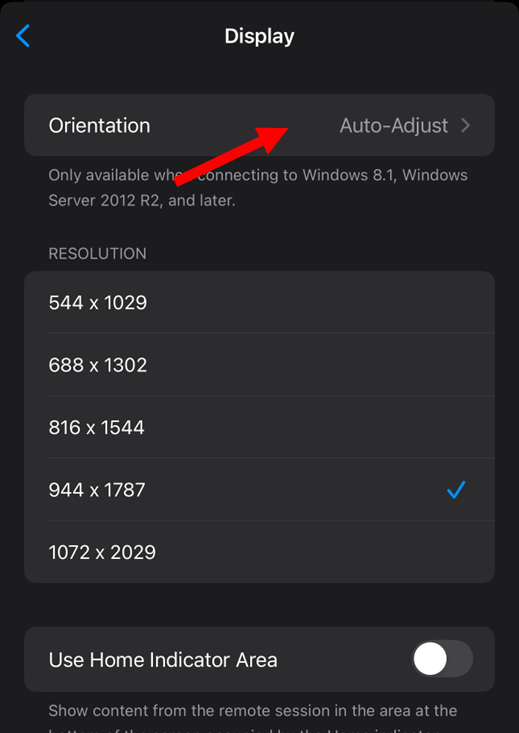
ช่อง `Orientation` ให้ทำการเลือก `Lock to Landscape` ส่วน Resolution สามารถตั้งค่า Custom ได้ตามต้องการ จากนั้น กด <mark style="color:blue;">`<`</mark>  เพื่อ Back กลับ แล้วลอง รีโมทอีกครั้ง

<figure><img src="/files/9OXvQ0lh2zCYBaCbtM7e" alt=""><figcaption></figcaption></figure>


---

# Agent Instructions: Querying This Documentation

If you need additional information that is not directly available in this page, you can query the documentation dynamically by asking a question.

Perform an HTTP GET request on the current page URL with the `ask` query parameter:

```
GET https://doc.mt4.cloud/vps/windows-app-iphone-ipad.md?ask=<question>
```

The question should be specific, self-contained, and written in natural language.
The response will contain a direct answer to the question and relevant excerpts and sources from the documentation.

Use this mechanism when the answer is not explicitly present in the current page, you need clarification or additional context, or you want to retrieve related documentation sections.